Showing posts with label Review. Show all posts

Wednesday, June 26, 2013

WIP Wednesday 6/26

Untitled

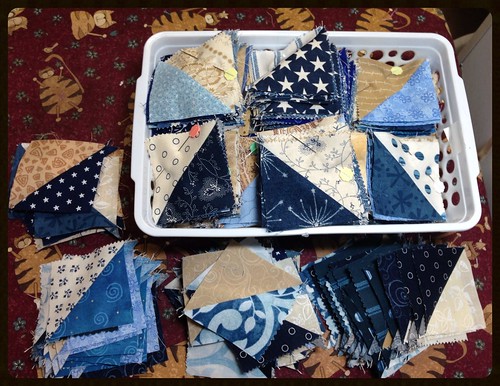
I finally made a dent in my Jamestown Landing quilt.  Its all I worked on all weekend.  It can be found in String Fling: Scrappy, Happy and Loving It! by Bonnie Hunter.  I finished all 840 half square triangles and I finished about 70 of 156 string blocks.  I started sewing the HST's into broken dishes blocks too but I didn't get a picture of that.  I can't wait to get this quilt done.  Its for my bed and the first quilt I have kept for myself in a long time.  I have been looking into sending it out for quilting because its going to be pretty big but I just don't think its going to be in my price range.
Untitled

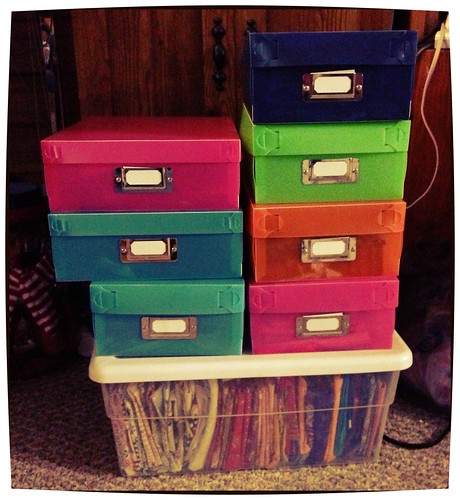
I posted awhile ago that I purchased these totes for organizing scraps and I would share my thoughts after using them for a bit.  I purchased two different sizes.  Here are the links to both:


I love them.  I think I prefer the wider flatter size.  They are not super sturdy as they are just thin plastic but they are great for small pieces.  I have my scraps sorted by color now.  The only complaint I have is that if you pack them too full the cover won't stay on.  But I had some small adhesive velcro dots and that fixed that issue.  I put all my bigger pieces, fat quarters or larger, in that tote on the bottom.  Now I just need to find a place to store them in my teeny tiny house.

This week I am linking up to Freshly Pieced And Esther's blog.  
  WIP Wednesday at Freshly Pieced

Tuesday, June 4, 2013

Quilt Block Storage Ideas


Untitled

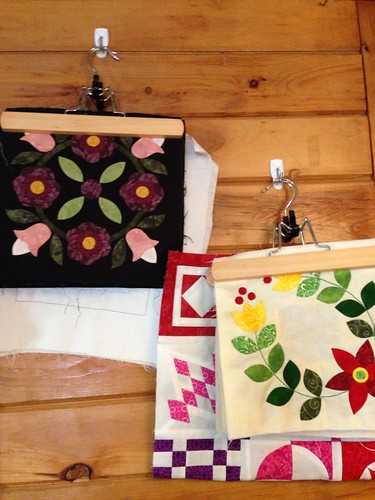
I just wanted to share a quick tip I had for storing quilt blocks.  I don't have a lot of storage in my teeny tiny house so I needed to come up with a way to store works in progress.  This is probably a known idea but I haven't seen much on it.


I use these pant hangers.  I love storing my blocks this way.  They stay ironed and I can organize each project on a separate hanger.  I can even keep partial quilt tops stored this way.  Right now I have mine hanging on Command Strip Hooks on my wall as I don't have a closet in my sewing area.  

They do tend to collect a bit of dust if they are there for a bit but all I do is shake them out a bit.  

Do you have any storage tips like this to share?  

Wednesday, May 22, 2013

Product Review: SteamFast Mini Iron


  • 420-watt mini steam iron removes wrinkles from almost any fabric
  • 1-2/5-ounce water tank; heats up in 15 seconds; variable temperature settings
  • Non-stick soleplate; 1-touch steam control; dual voltage for travel convenience
  • Heat-resistant travel bag and plastic measuring cup included
  • Measures approximately 5-2/7 by 3 by 3 inches; 1-year limited warranty


I was searching for a small iron to take with me to quilting classes when I came across this iron on Amazon a few weeks ago. It was inexpensive at 19.99.  I also have Amazon Prime so shipping was free for me.  So I figured I would give it a try.  I was going to a Bonnie Hunter workshop and would try it out there.  

I loved it!  I could not believe how hot it got.  It was the perfect size.  It wasn't too small yet perfect to fit in my bag to go to class.  It came with a travel bag as well.  It also has a switch on it to change the voltage if you are traveling overseas.  The cord was long enough to reach from the outlet and then some.  

My neighbor also shared this iron with me all day and she loved it too.  I have a huge heavy iron at home but now when I am just ironing small pieces when piecing I use this one.  Its lighter and very ergonomic.  I have carpal tunnel and its so much easier on me.  I still break out the big iron for larger yardage.  

I'll be honest I never tried the steam function on it.  I don't use steam when I am quilting.  However, the reviews on Amazon raved about it.  I have only used this lightly over the past month so I am not sure if it will hold up long term but for such an inexpensive price I am willing to take my chances.  

If you are looking for a decent travel iron for classes this is a great one to try out.  


Tuesday, August 28, 2012

Bloc-loc Rulers


I thought I would share a tool I just recently purchased.  And fell completely in love with.  When I was doing my recent top Garden Patch, I had to piece approximately 500 half square triangles.  One thing I learned from doing this pattern is to read all the way through a pattern before you do anything.  The first step was to cut all of your fabrics.  This pattern required you to cut larger squares and then later had you trim them down to make your triangles.  If I would have noticed how many triangles I had to trim I would have cut them to the accurate sizes.  

Anyway, about half way through the quilt I found this tool online.  Its called the Bloc-loc ruler.  I purchased it from Missouri Star Quilts.  I don't think I can even describe how much I love this ruler.  If you have to make a large number of half square triangles this is the ruler to have.  See that line through the middle?  That line is a quarter inch in size and its recessed into the ruler.  Your seam line sits perfectly in there.  So when you trim your block it doesn't move and the ruler doesn't slide.  After you do one corner you simply slide it to the other and turn the block around.  It made the process so much quicker.  

Here's a video showing how it works: 


Isn't it great!


Bloc-Loc Ruler Acrylic ruler squares up triangles perfectly


Craftsy Logo